Wednesday, December 25, 2013

Merry Christmas to You All!

Well, yep. I missed another couple of days, didn't I? I just find it difficult to do a post every day. I seem to run out of time. Well come to think of it - that's been my story all year. I've just run out of time!

Anyway, I'm posting the remaining cards I made this Christmas. (There were others, but I posted them before photographing them. Not bright!) I'm not going to discuss each one as they mostly use the same stamps, dies and papers that I've mentioned previously. Here they are.


I will mention the Christmas Tree die used on the last card. It is from Hot Off The Press and worked really well with the Heartfelt Creations Collection. Plus a reminder for next year - start making the Christmas cards in August and don't used rhinestones - just glitter glue. They still ended up costing me a fortune in postage, as once I added a rhinestone, the cost went up "to protect them from damage from the machines".

Finally I want to say to all of my readers a sincere "Merry Christmas" and thank-you for your support this year. It has meant so much to me to know there are people who care about me, especially through some of the hard times I've had this year. To those of you who have sent Christmas wishes, thank you. You are all wished the very best for the holiday season and I hope that next year is prosperous, happy, safe and healthy for you and your families.

I'm sending you some Christmas roses. May they brighten your day.


Love to you all,
Janelle
:)

Sunday, December 22, 2013

Days 6 & 7 Christmas Cards for You

Hi again to all!

I'm including four cards today as I've missed a day - sorry!


My first card used a card topped from the Heartfelt Creations Christmas Card Paper Collection, which was so pretty on its own; but I jazzed it up with a die-cut greeting using the Cottage Cutz Homemade Christmas Gift Set and some red rhinestones.

This image is so lovely IRL.

This second card used the second run of the die cut sentiment I created for the card on Day 2, using the die from Cottage Cutz Homemade Christmas Gift Set . I used a card topper from Heartfelt creations, but the background paper came from Couture Creations.

I finished the card with some chocolate rhinestone strings; once again trying to stick with my "less bulk - less postage" concept for this year.

For this third card I really let loose! 

The cream cardstock was dry-embossed with a Couture Creations embossing folder called "Wild Poinsettia" which I thought appropriate since I added a smaller bloom from the Heartfelt Creations stamp and die collections. The leaves were die-cut using some leaf dies from HOTP, which worked well with the border cut from Spellbinders.
I also applied a strip of steel grey glitter using a strip of double-sided tape.


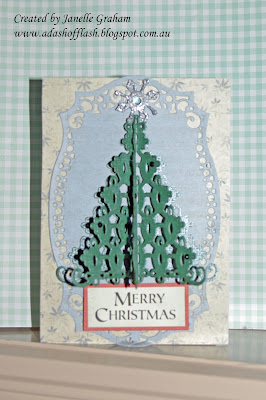
The last card for today was based on a die from Heartfelt Creations called "Banners and Trees". I die cut 4 trees, folded each one in half and glued the edges together to create the 3D tree. This idea came from Emma Lou Beechy, but she uses 5 trees. Even though it looks bulky, the tree can be folded down fairly flat for postage; and then spring back once it's reached its recipient. 

I also used a background label from the Spellbinders Majestic Labels Twenty-five. The glittered star was from the Banners and Trees set; cut from cardstock that had double-sided tape applied to it and then glittered after cutting. You can't see it very well, but the tree was cut from some pearlised cardstock, so it adds some nice texture to the card.

I'm enjoying my cards display and I hope you are seeing something to inspire you as I go along.

Lastly I must congratulate my friend, Therese Calvird, on a wonderful collection of bright floral cards in the latest edition of Australian Cardmaking, Stamping & Papercraft. These cards are totally delicious and have got me thinking about creating some floral cards after Christmas. Well done, Therese. It's always lovely to see you get the recognition you deserve.

Anyway, bye for now.

Love, Janelle

Thursday, December 19, 2013

Day 5 - Christmas Cards for You

The days are going too fast - I keep forgetting if I'd ready done the next post or if it's yesterday I'm thinking of. :) CFS brain! 

I'm back again with two more cards, made mainly using the Heartfelt Creations Christmas Card paper Collection, stamps and dies.


This first card was very easy to do as it used one of the card toppers, but I cut out the bracketed panel, stamped the greeting on to a white panel that I attached to the card front and then added the frame and the fussy-cut bird on a limb with some foam tape to add interest. (You can't see that part clearly in the photo, but the depth looks good.) I then added some rhinestone strings around the square. I then finished with a little glitter glue snow on the pine needles.
This second card used a piece of the B side of one of the papers. I then cut out an oval from some patterned scrap, stamped the greeting and coloured with Copic markers.

The die is from Spellbinders Majestic Labels Twenty-five. I used a purpley-grey cardstock, which was the closest I had to the grey-blue on the paper. I love the unusual colour combo and the red rhinestones somehow stop the card from being boring. 
What do you think?

Anyway, that's all for now. See you again tomorrow.

Love, Janelle

Tuesday, December 17, 2013

Day 4 - Christmas Cards for You

Welcome back for another dose of Christmas inspiration.


My first card here is another very simple one that used the card topper and just a little glitter glue around the snow and some red rhinestones on top of the flower in each corner embellishment.

The stamped sentiment came from the Christmas Song Precut stamp set. (I've used it on some other cards also.)

I wanted to keep my postage costs down as much as possible because last year I had to pay double the standard for a lot of my cards, and it ended up being very expensive. Consequently this year, I'm trying for fewer layers and smaller rhinestones, unless I plan to hand deliver.


My second card here used the Christmas tree die from the Banner and Trees die set from Heartfelt Creations/Spellbinders. 

I copied a technique from Emma Lou Beechy where she die cut a number of trees and then adhered them to the cardstock background so they are placed "head-to-tail" across the panel; thus creating such a pretty background. Alternately, if you had a large background die, you could just used it; but it's nice to make it a little more original.
I attached some white vellum flowers that I made using the Posy Patch stamp and die sets that I then heat embossed with white embossing powder. I finished them with a dab of clear glitter glue in the centres. The sentiment panel came from the Christmas Card Paper Collection.

Thanks for taking the time to look at my creations as I'm enjoying showing off ...ur...showing them off to you.

Bye for now,
Janelle

Day 3 - Christmas Cards for You

I almost forgot!

Here are another two cards that I've created for my friends and family for this Christmas season. 


This first card used the Poinsettia stamp set and the Sun-kissed Fleur die set, as well as the Christmas Card Paper Collection  from Heartfelt Creations. I used some stray light gray paper for the background, but I don't remember its source.

On the tips of the petals I applied some clear glitter glue and the centre was achieved by dropping a dab of Diamond Glaze and then sprinklings of copper and bright gold glitter.

Not sure about the colour of the poinsettia, though; perhaps it's a little too pink.

This second card is much more simple and only involved some glitter glue around the edges of the foam-taped sentiment strip and in the centre of the star.

When the colours are muted, like in this collection, it becomes difficult to find (at times) the right coloured cardstock to match.


Wait until you see one of my cards tomorrow. You'll be surprised!

Anyway, bye for now,
Janelle

Sunday, December 15, 2013

Day 2 - Christmas Cards for You

Back again with another couple of Christmas cards for you to see.

This first card uses a card topper from the Heartfelt Creations Christmas Card Collection, but I didn't like the sentiment that was printed inside the centre; so I die-cut the Merry Christmas out of some cream and red cardstock, backed it with some double sided adhesive paper, replaced the cream for red letters and then sprinkled on green glitter for the swirls. The die is from Cottage Cutz Homemade Christmas Gift Set that I got on sale at Photo Continental. (You'll see a couple more of these dies used in the next couple of days.)

You can't see it very well but the glitter in the swirls is really pretty and lifts the otherwise plain card.

This second card uses the paper and another card topper from the collection (as well as the stamp); but I have to admit to a stamping mishap - didn't position it properly - so I cut out the centre of the topper panel, stamped again on the card front and secured the frame and the bird image in place. I raised the bird on foam tape so it stands out nicely IRL. I had to finish with the rhinestones - I love the effect!


Anyway, that's all for today. See you again tomorrow with another couple of cards.

Bye,
Janelle

Saturday, December 14, 2013

A long time ... no see!

Welcome back! I've been incommunicado for a while, for which I apologise. Life got in the way and my blog had to take a back seat (though I did have a few commissions that had to be done).

I'd firstly like to share some good news and that is my husband has a new job. While it's only a four month contract, at least it's something, and we're hoping it leads onto something more permanent in the near future. (Big sigh and smile from relieved wife)


One of the commissions I had to do was to use the technique of bokeh. I'm showing you one of my prototypes. While it didn't suit the rest of the cards in the set, it was too pretty to throw away. I especially loved the colour combo I used (especially the purple). The sentiment is a lovely one from Kaisercraft and I heat embossed it in clear embossing powder over black ink. In the photo you can see that the embossing powder went over some of the background. (Yep, I forgot to use my anti-static pouch!) But I don't mind this effect, because I think it looks like the sentiment is sort of dreamy as well. I also used some of the Annabelle Stamps Scribble Scrabble-Round and Round stamp set for the background.  I'd not done much bokeh before, so it was a steep learning curve; especially working out what colours to use and the depth of colour that's best. I don't know whether this one really is "Bokeh" but I like it.


Christmas Cards
for You
Until Christmas, I will be sharing some Christmas cards that I've made for my friends and family. They were made using the Heartfelt Creations Christmas Cards Paper Collection as well as some of their stamps and dies. I aimed for quick and easy, but still stylish; but sometimes I got carried away. I hope you like them.


The sentiments on these cards aren't Heartfelt Creations but some freebies from the magazines I bought during the year. I love the "Merry Christmas" stamp - you'll see it in some of the other cards - and you can't see it in the photo, but the layer is raised on foam tape and the sentiment panel is flat on the card front. I coloured it in watercolouring pencils but didn't blend it or anything. 

Anyway, I'll be back with more tomorrow.

Bye, for now,

Janelle


Saturday, November 2, 2013

Something different

I made this card from a piece of misting I created while working out ideas for a recent commission. After fiddling around with it for quite a while. I decided not to use it as it was so much more colourful than the other cards in the set (didn't go with them at all). Rather than throwing the paper away, I wanted to try the type of card I often don't get right - the CAS - and just have the design with the sentiment stamped.


Somehow though, I think there's something missing. What do you think? I thought I should start up a category called "What's Wrong Wednesday!", but I don't have the facility to have people link up their solutions to my "mistakes" - so it looks like this will be a one-off post! 

I used a Kaisercraft Chevron mask and some Dylusions ink sprays (Vibrant Turquoise, Cut Grass and Lemon Zest) and then the sentiment was from Avery Elle Oh Happy Day stamp set. I inked the sentiment with some Ocean ColorBox chalk ink. I double stamped the sentiment to create a slightly wider font and I like the double tail at the start as just a happy coincidence. I also coloured in part of the sentiment and arrow with some Ocean Smooch.


I also want to toot my horn a bit...Some of my cards have been published in the latest Australian Simply Cards - Issue 61, which features six Quick Make Christmas cards using the Kaisercraft Gingerbread collection papers and other products.

I love doing my commissions for Practical Publishing, as I get to play around with a range of different styles and techniques. Once upon a time, all of my cards were shabby chic; but now, they are whatever is needed for the task - often way out of my comfort zone. I definitely need to do more challenges to remedy that! :)

Anyway, bye for now.

Janelle

Wednesday, October 30, 2013

Some Heartfelt Creations Creations

Well... I'm disappointed to say that I wasn't selected as a design team finalist for Heartfelt Creations, but I thought I'd let you see what I made as part of my finals submission.


The first item was a layout in honour of my mother's favourite sister, Ellen, who died last month. Auntie Ellen was also Mum's last remaining sibling out of six, so her death was extremely hard for Mum to take. This photo was one of the last taken of the two of them together on a lovely day we spent at my cousin's not long before she went into palliative care. (In case you're wondering, my mum is the lady on the right). I've since made a copy of this and framed it for mum for Christmas - but don't tell her as it's a surprise. Shhh! I made blue and beige flowers to decorate it and used a number of lacey dies to add texture and layering. The Vintage Floret paper has some lovely sentiment panels and the two I used suited this layout perfectly.

Heartfelt Creations Products used:
Other products: Spellbinders Shapeabilities Persian Accents die set, Dark Brown and white cardstock, Color Box – Olive pastel, Sea Crystals, Dark Brown, Toffee and Gray Whale, VersaColor – Pinecone, Tattered Angels Iridescent Gold Glimmer Mist, Off-white lace, Aqua satin and organza ribbons, Prima Divine Say It In Crystals pearl and rhinestone flourishes, glue and foam tape

The remaining two projects were cards made using some pink roses that I created. I wanted to make use of the lovely image on the paper in this first one, so I just placed the roses in position on top. I like how I fussy cut around the flowers that trailed off the edges. 


Heartfelt Creations Products Used:

Other products: Spellbinders Nestabilities Labels Five; Brown, cream and white cardstock, Color Box – Olive Pastel, Pink Sky, Dark Brown and Toffee, VersaColor – Pinecone, Tattered Angels Iridescent Gold Glimmer Mist, Kaisercraft Latte Pearls, mini smoke rhinestones, glue and foam tape

My final project used some Christmas tree die-cuts that I arranged to create a background. Emma Lou demonstrated how to do this technique recently, but I used it because I thought it suited the Persian border die-cut perfectly. I wish I had some other sentiments as the one I used here was just a fraction too large. I'll have to splurge on some other sentiment stamps.


Heartfelt Creations Products Used:
Other products: Spellbinders Shapeabilities Persian Accents die set; Spellbinders Nestabilities Labels Four; Brown, cream and white cardstock, Color Box – Olive Pastel, Pink Sky, Dark Brown and Toffee, VersaColor – Pinecone, Tattered Angels Iridescent Gold Glimmer Mist, pink ribbon, mini smoke rhinestones, glue and foam tape

I had fun as part of the selection process for this design team and it was great to get given some stamps, a die set and paper pack, so in the long run, the whole experience was well worth the effort. Maybe next time I'll have more success. I also must congratulate the lovely crafters who were selected and I'm looking forward to checking out their creations in the future.

Bye for now,

Janelle

:)

Wednesday, October 23, 2013

Back again ... Sorry it's been so long!

It's been such a long time since I've posted ... I thought you might like to know what I've been up to.

I had my hand and wrist operated on to release the carpal tunnel. I'm slowly recovering from this, but I have to admit it's not healing as well as the other wrist I had done 10 years ago. The scar on my palm hasn't healed properly and now has a hard lump that sticks into me when I grab onto something. But enough about that!

During this time I also had my Mum in hospital for emergency surgery for a twisted bowel and a complication from diverticulitis. It was very serious at the time, but she's well and truly recovering brilliantly. She astounds me with what she perseveres with - nothing stops her for long! Mind you, this happened the day after we buried her last remaining sibling (and her favourite sister, Ellen) who died the week before from mesothelioma. Quite stressful which has caused my CFS to flare up. Not good but I'll get better.

During this time I also completed my finals' projects for the Heartfelt Creations Design Team. I've included some close-ups and sneak peek of the flowers I made for my projects. 


I made a scrapbook layout using the blue flowers, featuring one of the last photos of my Mum and Auntie Ellen together. I've made another copy so Mum can put it on her wall. 

I created two cards using the pink roses I made. I was sent the Vintage Floret Collection paper stack, floral stamps and matching dies to create my projects and I loved creating the flowers (esp. the pink roses). I luckily had some other HC stamps and dies to incorporate as well.

I find out on 30th October if I've made it onto the Design Team. (fingers, legs and eyes crossed! :)  :)  :)  I hope I am good enough as I'd love the opportunity. 

Finally, today my husband was told that as from the 13th December he will be made redundant from his job with Main Roads (our State Government Road building authority) because of changes that have been made by our state government leaders - $#%$$@# idiots! Darryl was one of about 100 people "sacked" today. This is from a government that spruiks that it's about job creation. Hah! Luckily my hubby will have a little/some time to get another job before it impacts on our lifestyle, so once again fingers crossed.

Promise to post again in a couple of days.

Bye for now,
Janelle

P.S. Sorry for today's post - but it was a much needed vent! Thanks for suffering along with it!

Saturday, September 28, 2013

Why is it always the same way?

I hate it when I've just done a set of cards for a commission, struggling over what to do - when - along comes Annabelle Stamps and Andrea's brilliant group of designers with another (and exactly what I had been struggling to achieve) set of stamps. These stamp sets called "Scribble Scrabble 1 - Round and Round" and "Scribble Scrabble 2 - In the Square", perfectly reflect the use of geometric shapes.

Why Andrea didn't you release these sets a fortnight ago? Still you've made me happy as they are amazing and I can't wait to buy them!

Bye for now,
Janelle

Thursday, September 26, 2013

I'm a semi-finalist at Heartfelt Creations!

I just want to let everyone know I have been selected as a semi-finalist for the latest Heartfelt Creations Design Team call-up.

I don't generally do this, but if you would like to vote for me to be a finalist, you can go to Heartfelt Creations (follow the link) and vote according to the rules. Also by voting, you could win a $50 gift certificate from Heartfelt Creations. I'd love your support if you like my work. Voting closes October 18th.

Thanks so much!

Bye for now,
Janelle

P.S. For those of you who want to see more of my work, try my Pinterest board "Cards I've Made" where I've included cards that have been published as well as cards featured on my blog.

Saturday, September 21, 2013

Heartfelt Creations - I just love 'em!

I've been creating some cards using papers, dies and stamps from Heartfelt Creations. I came across this company at the Craft Expo in June and have been having a major love affair since. The designs used in these collections are gorgeous.


The three cards I've made are based around their Delicate Asters Collection and were made as part of my submission for a design team call out. I'm not sure if my submission will even be considered as I got my timelines out of whack and I think I got it in too late, but considering I've been through an operation on my left hand on Tuesday (carpal tunnel release) and I spent most of yesterday at the hospital with my mum after she almost collapsed at the shop with me from extremely low blood pressure and we had to get the ambulance to take her to the hospital, I don't think I managed too badly at all.

I'm looking forward to making my Christmas cards from their Christmas Card Paper Collection. The artwork on each page is so beautifully designed, it won't take much to make a card - all of the hard work is almost done already!

Anyway, bye for now.
Janelle
    :)

Monday, September 2, 2013

A quick Father's Day card

Just wanted to show a quick Father's Day card I made for my Dad. I was going to go with die cut letters and patterned backgrounds (similar to Therese Calvird's card), but I didn't get my act together in time - so I settled for a faster version.


The die cut was a left-over from last year's cards I made for my son's school (cut using my eCraft), the orange was left over from something I recently did and I've got enough washi tape to tie up the whole house if I wanted. I think it came up nicely, especially as I limited the palette and had the orange and blue to contrast for interest.             

I also must let you know that I've been published again - this time in Australian Simply Cards Issue 59. I did a selection of 6 cards featuring the use of a variety of different frames with a shabby chic edge.

It was while I was doing the research for this commission that I came across some blogs and tutorials about resin molding. This is something I want to try out myself. I'll let you know how I go with this technique.

Anyway, bye for now.
Janelle   

Sunday, August 25, 2013

Papertrey Ink Scrap-A-Faire 2013

I wanted to do a little cardmaking with the Papertrey Ink Scrap-A-Faire this weekend, as I missed it last year and it looked so interesting.
I managed to catch some of it last night, but at 10.00pm it's a little late to start crafting...so I turned on again this morning. They had a number of activities to work through, including Sweet Sugar-Coated Embellishments, Limited Ingredients Challenge, Tea dyeing, Scent-sational Cards (you know - scratch and sniff) and Custom Accents from the Kitchen (working with shrink plastics).

The first card I made was for the Limited Ingredients Challenge, where we were given a list of ingredients (materials) that could only be used - nothing else.


It was really difficult to stick to these colours as I desperately wanted green for some leaves - maybe I'll add some later! Also I didn't have exactly the same PI coloured cardstock and inks, so I had to approximate the look with what I had. The colours I've used include aqua, melon and golden yellow (though my golden yellow is slightly more pumpkin). I also used some light grey ink for the highlighting and the sentiment stamping. I also got out my clear glitter and added a dash; and since I've got it out, I'll do a card now following the Sweet Sugar-Coated Embellishments guidelines.


My second card has a glittered background over a collage of stamped roses. The strip at the bottom was inked after I laid down two strips of low-tack tape. In real life I used white cardstock as my base, but the glitter has picked up the pink from the stamps. I didn't have some spray adhesive like in the instructions, so instead I used VersaMark ink and then sprinkled over some Stampendous Stamp N' Bond, which is a heat activated adhesive powder. The glitter stuck to it really well and it was super easy to use.

I had plans to do some more cards, but I ran out of steam.

Anyway bye for now,
Janelle

Thursday, August 22, 2013

Cardmaking in Easy Steps Issue 11

I want to let you know of a great issue of Cardmaking In Easy Steps Issue 11, that contains a lovely range of die cuts, papers and a stamp set. It's on sale at the moment and features 6 shaped cards I designed. 

It's called the Fruit Sorbet Collection and is filled with lovely pastel colours and summery images. Check it out!

Bye for now,
Janelle

I missed it again... and again!

I've created two cards - one for Muse Challenge #30 and the other for Fusion Challenge #15. Unfortunately I missed the deadlines for both of them. UGHH! It's been a while since I've entered any challenges and I'm out of practice getting them finished on time. Anyway, I'll still write them up as if they were being entered, so here they are.

Muse Challenge #30

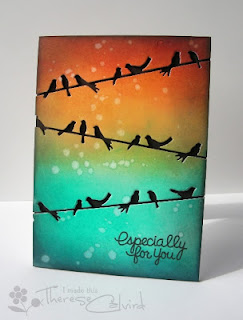
This card has been made in response to the stimulus card by Therese Calvird. I adored Therese's card as soon as I saw it, and I also knew I wanted to use my Dylusion sprays to create the background, as I've been experimenting with them.


I also love the use of the negative with the diecut birds on wires, so I found a die that I bought at the June Expo and used it with mine. I completed it with a gorgeous Heartfelt Creations sentiment and some yellow rhinestones. I used the navy cardstock for my background as I thought it was less harsh than the black looked (plus it was the first colour that was suitable that I found in the pile of cardstock I had on hand.) Tsk..tsk..tsk! I do love how the top layer turned out. I used four different colours: vibrant turquoise, lemon zest, pure sunshine and cut grass. I also sprayed a little patina and iridescent gold Glimmer Mists over the top using a The Crafters Workshop Mini Cell Theory mask to add extra dimension. You can see the effect in the left bottom corner.


The second card was in response to the hypothesis presented.


I wanted to combine the two challenges and use the sketch with the blackboard effect. The colours I used were not exactly correct for this challenge, but the lavender was the closest I could get to the gorgeous blueish flowers in the picture.


The swoop at the bottom of the sketch was achieved using a Marianne Design Designables folder (No DS0913) that I then cut around to accentuate the design. The Sizzix/Hampton Arts Times and Seasons stamp was white heat embossed and the flower was made with the Heartfelt Creations Delicate Asters stamp and die sets. The flower, in real life, is quite dimensional as I molded the petals both up and under to add some depth.


Anyway, I'll have to do better with my next challenge entries - we'll see. :)

Bye for now,
Janelle

Tuesday, August 6, 2013

A movie you MUST see!

I don't often endorse movies, but if you want a movie to lift your spirits see "The Way Way Back". 

Leisa (one of my friends) took me today as a belated birthday present. It was great - Gold Class cinema (we had the whole cinema to ourselves), relaxing lunch, some shopping and heaps of chinwagging. What more can you ask for from a friend!

Anyway, this movie is brilliant - we laughed, we cried and we also cried because we laughed so much! It has a great cast including Toni Collette and Steve Carell (he plays a surprising unpleasant bloke), plus a lovely storyline. Don't get me wrong. This is not a comedy, in fact it is a very poignant story.

So if you have a little time in between your crafting, take in this movie - I'm sure you'll love it!

Bye for now,
Love, Janelle

Saturday, August 3, 2013

A quick post

I'm just quickly letting you all know that I've been published again in Australian Simply Cards Issue 58. While I didn't have any of my cards on the cover, I had a fun time investigating and making a selection of 6 cards featuring the ombre technique. 


Hope you look out for it.

Anyway, bye for now.

Love, Janelle

Some photos for you

I'm posting some photos that should have been added on to my last post. These are photos of the projects I made at the Papercraft Expo in Brisbane back in June. (Wow, I didn't realise it was so long ago!)

Anyway, the first items are some cards I made with Emmy Lou Beechy from Heartfelt Creations. I loved the amount of glitter that we added - talk about creating a mess! They were made using the  Delicate Asters Collection of papers, stamps and dies.


The second project was an accordion book made with Rachel Greig from Darkroom Door. It was so much fun to make as I used the new Viva 3D-Stamp-Paint as well as Rachel's lovely stamps. I love the texture and sparkle this has when it's dry, and the colours are nice and vibrant.

The last project was made with  Jane Treganza and I used one of my favourite photos of my husband, Darryl and Alex. I have to admit I've never made a layout with as many bits and pieces on it as this one had, but I love the overall feel of it and it was perfect for a photo of my "two boys". Jane showed us a handy corner treatment that I'll have to do on a card sometime.


Anyway, that's all about this topic, but I did want to share an amusing piece of info about what else is happening in the crafting world. This is the address for an article about people making jewellery with mother's milk! (http://www.intocraft.com.au/2013/08/breast-milk-jewellery/ I think this is creepy! What about you? I've never felt the need to commemorate that part of motherhood.

The things people think of???

Anyway, bye for now.
Love, Janelle